WHAT'S NEW?
Loading...
Showing posts with label Miniatures. Show all posts

It's been a quiet few days on the site this week but we will be making up for that over the next few days with three articles! Starting with today's look at some Wildwood Rangers that I have decided to pick up and paint again. 

Back when wood elves the last wood elves codex came out I picked up a number of models because they looked really cool, but using them on the tabletop was a challenge for a new WFB player. I switched back to vampire counts and the models have been collecting dust ever since. 

Whilst browsing through an old white dwarf I came across a paint splatter tutorial and I decided to give it a go. 


The green, earthy look of the Rangers guy more with the theme of the rest of my army than the orange and brown used on the GW packaging. I also thought that it would fit nicely with the new Sylvaneth forces in Age of Sigmar. 

I really like these step by step painting guides that GW offer as I do find it a challenge to get the paint schemes right for a number of models. Although skeletons are quite easy thankfully. 


These guys may be no where near finished yet but I am really enjoying picking up the paint brush again. I will post another article once they are completed so that you can see the finished product and hopefully they will live up to the GW scheme I have followed. 

All the best,

Jon


Games Workshop have set up a global campaign! Again!! And if you cannot tell from my liberal use of exclamation marks I am just a bit excited. 

Over the next few weeks, Age Of Sigmar players will determine the fate of the Mortal Realm. Fighting is split into three arenas based on geographical location. As I am based in the UK I shall be fighting in the Greywater Fastness arena. 

Early indications are that the forces of Order are very popular and therefore they are likely to win it all at the end of the day. This is also reflected in my local area where the vast majority of players are using order armies, with a smaller number playing as Chaos. Finally you have muggins here as the sole representative for the forces of Death. 

The first battle scenario is a twist on the old battle lines scenario from Warhammer Fantasy Battles but with no points values (yet) victory conditions are slightly different. Quite simply, by the end of turn 5 the player with the most units/warscrolls in their opponents final quadrant (I will explain the quadrants in a moment) wins. In the event of a tie, the player who has killed more units in their opponents half of the board wins. 

To set up the board is split into 4 sections lengthways. Each player gets two quadrants on one side of the board, with a depth of 12" each and 24" total. Any unit of 10+ models must be set up in the 12" closest to the middle of the board, anything closer goes in the second quadrant closer to your own board edge. As a final twist, any unit of 10+ models that is wiped out can re-enter play in that players next hero phase from their own table edge. 

So with that all set out we can move on to the actual battle. I am representing Death, and Chris had his forces of Order. As there are no limitations currently in Age of Sigmar our battle ended up being quite one sided in my favour, but we will return for a second round with more balanced forces in future. 

To represent the uneven balance we went with a narrative of the Supreme Lord of Undeath Nagash launching a surprise attack on an unsuspecting column of Stormcast Eternals on their way to reinforce the mortal realm. 


Nagash, being the tactical genius that he is decided to hide behind the tower to avoid the dwarves with Grudgehammer Torpedoes who could really ruin his day. 

The liberators and skeletons started off in the centre, expecting a giant melee to ensue with a group of crypt ghouls on the flank. On the far flanks the prosecutors set up opposite the skeleton horse archers while the black knight bus and dire wolves set up unopposed on the left, with Terry the Terrorgheist for support. 

In the more reserved roles the torpedo dwarves seems up in the central forest hoping to pick off any monsters that came their way while there was a liberal sprinkling of vampires across the Death side of the board and Manny lording it over everyone in the centre. The Dracothian guard set up near their lords at the front of the back quadrant. Finally, 5 hexwraiths and 4 morghast set up to support the skeleton horse archers. 


Turn one, Order gets priority. 

A desperate all out assault is launched. The liberators charge the skeletons and ghouls in the centre while the Dracothian Guard charge a second group of skeletons in the pass. On the right flank a group of Paladins lightning strike in and charge the hexwraiths while the prosecutors jump forward and attack the skeleton horse archers before they can fire. 

With not a lot of shooting to do the dwarves blast away at some skeletons and the guard chuck their hammers at their opponents. 


Combat did not go too well for Sigmar's finest. The skeleton blocks managed to bog down the attacks from the liberators and on the flank the Paladins barely touched the hexwraiths. Unfortunately for the Paladins they were also too close to the morghast who were able to pile into combat and decimate them. 


In the skeleton horse archer/prosecutor battle the true MVPs were the skeletal steeds. It is nice to see that the classic WFB trope of horses being better at fighting than their riders still stands true in AoS. 

The counter punch from the forces of Death was brutal. The dire wolves and black knights charged forward to secure their area of the Order side of the board. In the centre Manny and Nagash decided to use magic to neuter the liberators stuck in combat and wipe the dwarves from the face of existence, although they would return in the next hero phase as per the scenario rules. 


With the Dracothian guard trying to use the pass to defend their flanks enough space was left behind for the vargheist to fly past and charge them in the rear. But just in case that was not enough Terry the Terrorgheist also jumped forward and proceeded to scream away their resolve, leaving behind little but quivering wrecks waiting to be picked off. 


The morghast attempted to charge the prosecutors but a double one said that it wasn't to be their day, not that it mattered with the super skeletal steeds giving them a good kicking all on their own. 


Turn two, Order gets priority. 

With the dead pile mounting Order made one last ditch attempt to break through the droves of dead marching their way. The liberators and dwarves re-entered play and attempted to punch through the dire wolves and black Knights, with the support of their Lord Celestant on a Dracoth, but Chris' dice abandoned him. A great vampiric charge tore through the Lord and Terry once again flew forwards to feast on his enemies. 


With all hope lost the Stormcast Eternals conceded defeat and fled from the battle. Their fallen comrades to be raised and initiated into the grand army of death. 

Post game analysis. 

I'm not really sure that there is too much to say about this one. The game was unbalanced to start, although both sides were happy to agree to this in terms of the narrative, but the forces of Order were willing to make a good go of it in the middle. 

The morghast and hexwraiths were particularly impressive and the skeletons made a good tarpon for the liberators and Dracothian Guard. I may well have to get some more morghast based on this performance, their movement and combat potential are deadly, and with enough wounds and saves to absorb some hefty damage they could really prove useful going forwards. 

But for all the strength of the true combat performers it was the skeletal steeds of the horse archers who have to take MVP. Completely unheralded coming into the game they kicked, quite literally, the butt off the prosecutors who came their way at the start. I get the feeling that they would have beaten anyone in this battle and are worthy award winners for the day. 

I hope you have enjoyed this short battle report today. Please leave a comment down below and let me know what you have thought of the Season of War campaign so far. 

All the best,

Jon

Today we have our second Bolt Action battle report, at around 1000 points, between the Americans and the Italians. Going into the game I felt that the Americans would have a distinct advantage over their European opponents seeing as they had a late war tank that most of the Italian forces would be unable to touch and also their favourable national rules allowing them to move and fire without penalty and enter from reserves without the -1.


As you can see below, the battle would be fought between two very experienced forces, both airborne focused although the American choice of two inexperienced vehicles could prove decisive.

Early/Mid War Italian Airborne

2nd Lieutenant SMG, Veteran Soldier SMG

Veteran Paracadutisti - NCO with SMG, 1x Rifle, 1x LMG, 6x SMG, AT grenades
Veteran Paracadutisti - NCO with SMG, 1x Rifle, 1x LMG, 6x SMG

Veteran MMG team
Regular Light Mortar
Veteran Sniper Team

Regular Autoblinda 41 (AB41)
Regular M14/41

Late War US Airborne/Rangers

1st Lieutenant, Veteran Soldier

Veteran Forward Air Observer, Veteran Soldier

Veteran Ranger squad - NCO with SMG, 8x rifles, BAR
Veteran Airborne squad - NCO with SMG, 8x rifles, BAR
Veteran Engineer squad - NCO with SMG, 5x rifles, 2x BAR
 
Veteran Airborne Light Mortar
Veteran Bazooka team
Veteran Sniper team

Veteran Light Howitzer
Inexperienced M3 Halftrack 
Inexperienced M4 Sherman

 The Scenario

Scenario 4 was the order of the day and the Italians came out as defenders, thanks to their national rule allowing the re-roll for attackers/defenders. This benefited the Axis forces as it allowed them to set up one emplacement and meant that they could set up two units close to the objective. The D3 roll for emplacements only saw the Italians have one, but this was all they needed.
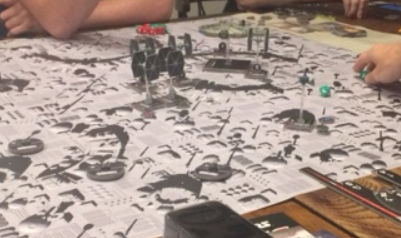

Deployment

The Hanomag at the crossroads marked the objective, and the Italians picked one Paracadutisti squad and the AB41 as their two units to start on the board.

The American infantry divided into two. The HQ, FAO, Sniper team and Airborne squad pushed on from the cornfield in the top left, while the Rangers worked their way down the road to the right.

The Italian Sniper team set up in the house overlooking the Hanomag from the "South".


Turn 1

The Americans made the first move with their sniper rushing into the house at the "Northern" end of the board. The sniper team would set up shop here for the rest of the battle, although this may not totally have been out of choice.

After this first move the momentum quickly swung to the Italian side. The Paracadutisti squad by the Hanomag advanced to the other side of the bocage and opened fire on the sniper team from within 12". While the sniper team survived, it did lose the second man and was impeded for the remainder of the game. The AB41 rolled through the bocage in the opposite direction and laid down suppressing fire on the Airborne squad hiding in the field, claiming one rifleman.

The Italian first wave was comprised of the Light Mortar Team, a second Paracadutisti team and the M14. With the majority of the American forces on the far side of the board the Rangers bore the brunt of the Italian firepower. The sniper hit the squad but failed to cause a casualty, unfortunately for the rangers the 3 MMGs of the M14 (2 hull-mounted, 1 co-axial) did cause a casualty and forced them to go down when they failed their leadership check.

The remaining American forces shuffled forwards but were unable to cause any damage. The Italian light mortar dropped some smoke in the middle of the board (which the American's placed).


Turn 2

Turn two opened up with the American sniper team again. This time managing to hit the Italian sniper, but failing to cause a casualty. But this did force an order check on the Italian sniper which it failed. The American vehicles both faced their first order checks, and both failed to roll under 8, this also pinned the engineer team off the board as they were in the M3 Halftrack.

The AB41 continued it's personal vendetta against the American Airborne, laying down some more fire on them and picking off one regular rifleman with the light auto-cannon.

While the Rangers managed to get some respite from the sniper fire the second Paracadutisti squad quickly took the place of their sneaky comrade. With the additional firepower of the M14 backing them up the pins piled up on the Rangers, and to make matters worse and exceptional MMG bullet found it's way through the squad to take out the NCO.

Two American teams did manage to enter from reserves, the Light Mortar and the Bazooka team. The Light Mortar attempted to hit the Paracadutisti team on the road, but missed and the Mortar team tried to hit the AB41, also missing.

The Italian MMG ran onto the board behind the M14, the third Paracadutisti squad arrived and the Italian Light Mortar dropped some more smoke into the middle of the battlefield.

Finally the US FAO decided to make a break from cover to call in an airstrike next turn, but was left out in the open for the first Paracadutisti squad to fire at... Also placing them within 12". The next dice out of the bag would prove important. If it was Italian then the FAO was likely to die...


Turn 3

... And the first dice was an Italian dice. The 1st Paracadutisti squad charged the FAO, wiped out the squad and regrouped back to the other side of the bocage. Getting some revenge was the American light mortar landing a hit on the Italian team and causing some casualties.

The Airborne decided to push forwards towards the objective, using the American Lieutenant's leadership bonus but the AB41 kept them back, with an exceptional shot taking out the NCO.

The American Light Howitzer arrived but, being a fixed weapon, could only sit and watch for the rest of the turn. The engineers and Halftrack failed to arrive, leaving the Rangers all alone facing impossible odds. A quick flurry of Italian dice saw the second and third Paracadutisti squads, the Sniper, the M14 AND the MMG open up on them. Needless to say, those that survived the onslaught broke and ran for home (I believe at the end of it they had to roll a 3 on the leadership test to remain in the game).


The American sniper fired a futile shot at his Italian counterpart, missing. And the Sherman finally arrived and opened fire on the first Paracadutisti squad. The American light mortar missed his target, as did the bazooka team and the Italian light mortar decided that more smoke was required so that the battlefield looked more and more like a men's toilet at a football game during halftime.


Turn 4

With the tide turned well and truly against the Americans the Halftrack finally decided to arrive... And summarily get wrecked by the Paracadutisti. The Engineers picked up 3 pin markers (MMG, 2x Paracadutisti squads) in the process. 

The M14 decided to pick a fight with something it's own size but failed to hurt the American Sherman, before the first Paracadutisti squad charged it. Unfortunately, there were not enough men left to hurt it and so they took cover on the other side of the bocage. The Italian sniper took a dislike to the American howtizer team and managed to hit them, while the AB41 continued to pick off US airborne who had barely managed to advance beyond the field they started in.

At this point, with 3 teams already wiped out, another two well and truly pinned down and no full Italian squad destroyed the American commander signaled the retreat. 

VICTORY TO THE FOLGORE!!!

Post Battle Analysis

Well the first thing I want to do is make sure that I either 1) write up our report sooner next time or 2) take notes during the battle! While I believe I have managed to relay the story of our game correctly I can't help but feel that I have missed something or got one thing or another muddled up.

In terms of the game, we both realised just how much of a liability inexperienced units are. With the two American vehicles spending most of the game out of the fight the US forces were at a distinct disadvantage. If the Sherman had arrived earlier then there is every chance it could have pushed back the Paracadutisti squad that knocked out the US FAO, and this was without a -1 to the reserve roll!

The American sniper may also have been too close to the main battle to be truly effective. While the house did provide excellent cover for him, he ended up too close to the Paracadutisti, and was duly punished. With that -1 from losing his squad member and most targets of opportunity being over half range, his ability to hit targets was severely reduced. With only one shot per turn, you do not want to see your greatest strength nullified.

Although it may seem that I went a bit crazy with the smoke in the middle it really did prove to be a lifesaver on one occasion, as the it blocked the bazooka from targeting the AB41, which was then able to keep the US airborne stuck on the wrong side of the board.

As the Italians I knew that I had to make sure the centre of the board, and the objective were securely held throughout. If I abandoned the objective to go hunting some of the smaller American teams, which was tempting, then when the Sherman eventually turned up it could have feasibly held me back. Also, by staying close to the objective, it forced the Americans to bring their forces in close to my Paracadutisti, and with the overwhelming number of SMGs, as soon as they were in range I was able to tear apart the American squads, as shown with the rangers. Against a more effective long range force I may have had issues, but I felt that I used cover quite effectively to deny LOS and get the -1 to hit modifier.

What are your thoughts on the game, where else can we improve our tactics for our next game?

I hope you have enjoyed reading as much as we enjoyed playing the battle. 
 
Until next time, thanks for reading!

Welcome back to JonDoesGaming, it has been a quiet few weeks on here due to some real life matters but we are now back with a bang!

Today we are taking a look at an introductory battle in the WW2 tabletop strategy game Bolt Action, to make things easier we limited the armies to only 500 points and neither side brought tanks. So before we get down to the actual battle lets take a look at the two armies involved.

Early War Germans

Oberleutnant - SMG, Regular soldier rifle

Veteran Infantry Squad - NCO with SMG, 7x rifles, LMG and Loader

Veteran MMG

Veteran Sniper team

Mid/Late War British

Artillery Forward Observer (Free) - SMG, Regular Soldier SMG

Second Lieutenant - SMG, Regular Soldier SMG

Regular Infantry Section - NCO with SMG, 7x Rifles

Regular MMG

Regular Medium Mortar with Spotter

Regular Recce Carrier with pintle-mounted LMG

Looking at the two lists involved the British forces had two main advantages. Firstly, they were a mid/late war list and this allowed them to take SMGs on their NCOs, without this everyone in the squads would have been armed with rifles. With hindsight this may have worked in the British army's favour with the "Rapid Fire" national rule but we managed to forget about this for much of the battle and it didn't come into play.

The second advantage for the British was the Recce Carrier. The Carrier was impervious to all of the available German weaponry and with two LMGs could suppress most units as effectively, if not more effectively than the MMG.

The Scenario

The scenario in play was "Top Secret" and we were using the Downed RAF Pilot as our objective.

The setting for our battle was a small French farming hamlet with some ploughed, and some corn, fields.

The downed pilot was in the middle of the hamlet, hidden from view here, next to the blue-topped house. The British forces would enter the battle from the right hand side using the buildings as cover while the Germans would have to approach from the more open fields.

Deployment

We made a small error here as we forgot to deploy the Forward Artillery Observer team before the battle began, instead they would enter the battle alongside the rest of the British forces. The spotter for the British mortar set up in the house at the far end of the hamlet giving him a good view of all proceedings. The German sniper team set up in the small wheat field towards the German side.

Turn 1

The first dice out of the bag was British, and the Recce Carrier trundled on before opening up both LMGs on the sniper team in the field. The sniper was pinned and his spotter died but he remained steadfast.


Unfortunately, for both sides, about half of each army decided they did not want to get involved in the battle early on and proceeded to remain off the table, including the British HQs!


The Forward Artillery Observer made it to the ruined house and set up by a window, ready to call in some support at a moments notice.

Two squads of British infantry made it to the battle, one taking up position alongside the Recce Carrier and the other flanking the ruined house.

The German sniper did manage to put one pin marker on the squad on this side of the ruined house, a German infantry squad and their HQ arrived but apart from that the turn remained pretty uneventful.

Turn 2

Now things started to heat up. The first dice out of the bag was German and the infantry squad in the cornfield decided to advance and open up on the British infantry squad that arrived last turn, keeping them away from the pilot in the centre of town. Unfortunately for them they were just out of range which meant that when a British dice came out next they were able to move up in full knowledge that they would be in range, pinning the German squad.


Towards the centre of the battle, the second British squad moved up to the bocage alongside the small cornfield in the middle of town. The Recce Carrier pushed forwards and forced the German sniper to hit the deck. The British mortar team arrived from reserve and set up behind the ruined house, relying on their spotter to pick out their targets. The British HQ decided that things had turned in his favour and took shelter in the ruined house waiting for his chance to claim the glorious victory.


The German reinforcements decided that this fight was still not for them and stayed hidden, the final action of the turn was for the FAO to call in his artillery bombardment right by the HQ and sniper.


Turn 3

The artillery arrived with a thunderous cacophony, putting two pin markers on each of the sniper and German HQ, but with very little else on the German side the effects were negligible.

After the bombardment the German reinforcements decided it was time for them to show up and put a bit of pressure on the British forces. The German MMG set up in one of the ploughed fields near the British spotter trying to get a good field of fire across the centre of town. The British countered this by sending the Recce Carrier through the cornfield and unloading both LMGs into the MMG, pinning it and killing 2 of the 3 crew.

The British mortar opened up on the German infantry but failed to find its range.

One British squad moved forward to grab the objective but the second infantry squad, which had been targeted by the German sniper previously, failed its order check and hit the dirt. This left the first squad out in the open without much support and they proceed to pick up pin markers from every direction.

The British MMG arrived and set up in a position to provide cover fire for the British forces to pull back with the objective, however, the final British squad remained out of the fight.

On the German side the final squad arrived and pushed up as far as they could.


Turn 4

With the squad holding the objective under heavy fire the British forces jumped into action to provide support and get their pilot out of there. The mortar tried, and failed, to find its target again, the Recce Carrier moved forwards to block the line of sight to the squad holding the objective and unloaded both LMGs into the German HQ unit, but failed to hit the target. The first infantry squad, who had taken most of the German fire up to now, managed to pass their order check (with 4 pin markers!) and caused four casualties to the nearest German squad.


The HQ and second infantry squad moved into a position behind the first squad and proceeded to move the objective back away from the German front lines. The British FAO team came under fire from the sniper and they were blown away, but this did open up a lane of fire for the British MMG to wipe out their German counterpart. The final British infantry squad arrived and the pilot passed to them.

At this point we called the battle as there was no way for the Germans to stop the pilot escaping with the British.

Post Battle Analysis

After the first turn was out of the way the action was fast and furious. With German numbers so low the fact that half of their force didn't arrive until the latter half of the battle really hamstrung their plans. While the German veterans were more resilient than the British regulars, the greater numbers of the British forces allowed them to overwhelm their opponent.

The Recce Carrier, proved to be points well spent, if a little overpowered for this battle, as it provided a reliable rate of fire to keep some of the nastier German units held down. Knocking out half of the sniper squad, and two thirds of the MMG team really helped to keep the pressure on the Germans. Another candidate for the MVP title was the first British infantry squad, they grabbed the objective, held their ground and passed an order check at -4 while also taking down 4 German infantrymen.

I was left underwhelmed by the Medium Mortar, needing a 6 to hit each time the enemy moves mean it is 50 points that can probably be spent better elsewhere. I have no doubt that when it hits it really hits hard but the lack of hits really limits its effectiveness.

On the German side, the sniper has to be the MVP. It was handing out pin markers like candy and certainly posed a threat that I was unsure of how to deal with. I would certainly consider including one of these instead of the mortar in my next British army.

The scenario was fun, although being able to pass the objective down a "conga line" did seem a tad unrealistic at the end. I don't feel this would have made much difference as the British forces had swarmed the centre of the town at the end and I could not see any way for the Germans to secure the objective for themselves.

All in all, Bolt Action is a great game, with simple rules that make it easy to learn but challenging to master. I look forward to adding armour to our battles and also the possibility of using the experimental rules for aircraft when the time comes.

For those interested in seeing more Bolt Action battle reports on JonDoesGaming be sure to check in from time to time as we will be covering the following armies:

Belgium
EW Germans
LW Germans
Russians
Americans
Italians
Japanese
French and more!

Cheers,

Jon
A couple of weeks ago we managed to get in our first game of X-Wing and it was great. In an effort to get everyone in on the game we set up a 3v3 110pt game, one of us brought Han Solo and he would proceed to dominate the show!


Rebel Alliance

Han Solo - Chewbacca, Gunner, Millenium Falcon, Engine upgrade
Red Squadron - R2D2
Red Squadron


The Galactic Empire

TIE Phantom (Whisper) - Advanced Cloaking Device, Tactician
Academy Pilot
Academy Pilot
Academy Pilot
Academy Pilot
Academy Pilot
Academy Pilot

Set Up

As this was our first game we decided to avoid over-complicating matters with the addition of obstacles and so the battlefield(?) was just open space. Both teams were quite expansive with their setups, the Rebels placed Han in the centre and the two Red Squadron Pilots took up position in the opposite corners of their deployment zone.

For the Imperials the plan was simple, trap the Falcon in swarms firing arc and bring it down as quickly as possible. To this end the Imperial squadron set up with all six Academy Pilots lined up across the centre of the board with Whisper holding the left flank.


The Battle

With the lowest pilot skill the Academy Pilots got to move first, there would be no finesse to the early stages of this engagement, the Imperial forces steaming straight up the board like a freight train. The two Red Squadron pilots closed in on the flanks of the Academy Pilots while while Whisper silently drifted in behind the grey wall of TIE Fighters, and the Falcon mirrored the movement of the Phantom. The only action of note at this early stage was Whisper cloaking for the bonus 2 move at the beginning of the next turn, unfortunately I misjudged the distance and this failed to benefit us whatsoever.


Han and a couple of the academy pilots traded blows but neither managed to land a hit.


The next turn things began to get interesting. With the opportunity to move first the academy pilots swarmed Han Solo and AP5 managed to position itself perfectly to cause a collision with Han, preventing him from taking an action this turn. One of the Red Squadron pilots (25) managed to get a target lock on AP42 but it came to nothing, the other RS pilot (3) brought down AP6 with the help of Han. Whisper landed a hit on Han and proceeded to re-cloak.

At this point the Imperial forces made an error, forgetting that ships could pass over other ships as long as their bases didn't finish in contact, which allowed Han to escape our trap. AP5 moved to
block off his escape but left just enough room for Han to move into the space left in the wreckage of AP6. Han did collide with Whisper but he was now out of the arc of most of the academy pilots.

Please excuse Han being off his stand at this point, we couldn't fit all the models in!
RS3 brought down AP2 and the Imperial formation quickly fell into disarray. RS25 continued to target lock AP42 to little effect and AP41 managed to land some hits on him while AP42 and Whisper cleared out the shields on RS3. AP1 landed some more hits on Han but Chewie brought the shields back up, AP5 brought his ship around to re-enter the fight.

At this point Han proceeded to run circles around the remaining Imperial forces as 3 Academy Pilots clustered together trying to get him back in their sights. RS25 continued to chase AP42 across the board and so the Imperials hatched a plan to trap him in the cross-hairs of as many ships as possible. With one shield back up RS3 tried to escape Whisper who had de-cloaked again to get the best firing position on the Rebel ship. AP41 decided to take on Han 1v1 at this point as he really didn't have anything better to do.

With the Imperials springing their trap RS25 tried to escape but it was too late. Caught in the crossfire of APs 1, 41 and 42 RS25 was blasted into oblivion. RS3 tried to escape in all of the commotion but Whisper finished him off. AP5 was left to face Han on his own... it didn't end well.


With the X-Wings down the remaining Imperial ships tried to catch Han, but his superior maneuverability and 360 firing arc allowed him to pick off each ship one by one with Whisper the final Imperial to fall.

Post game thoughts

Wow Han really is as good as everyone says. The boosted movement from the engine upgrades combined with the special abilities of Han, Chewie and Luke make him a really tough nut to crack that also packs a powerful punch. I feel our idea to swarm him and take him down first was sound, the two X-Wings, while resilient to a degree, did not pose as much of a threat as Han did and they were easy enough to bring down when we brought our firepower to bear. With only one defence die if you were able to score enough hits from the Academy Pilots then you could do a lot of damage to Han but the issue we faced was trying to get him in our sights. Early on we had a chance but one mistake cost us as it allowed Han to escape our net.

On the Imperial side I was really impressed with Whisper. The Phantoms boost movement after de-cloaking can be really useful and the Advanced Cloaking System means that most ships will not be able to hit the phantom as easily if your pilot skill is high enough. I felt that our TIE Phantom build was strong but it is expensive coming in at around 38 points. To make the most of this ship you need to have high pilot skill and the Advanced Cloaking System gives it the added survivability but there may be a better use for the two points we invested in tactician once we have some additional ships at our disposal.

All in all it was a great game and I was glad to get the first game under my belt, I'm sure with more experience I will be able to bring down Han, we just might need a bit of luck (and some bigger guns) to achieve it!


Hi,

So this is Bob, I first intended to do this post for #WIPWednesday however real life came up and threw me a curveball and this is now 3 days late. I don't intend to go into much detail regarding this, basically it won't be a painting guide (I may do one of those later), it is just to quickly go over painting the model.


At first I really thought I wouldn't like these models, they were too 40k, not enough of the fantasy I knew and felt that GW were betraying their heritage. Basically I had turned into an internet troll, but I have managed to get past that stage without burning my whole collection. Now I have to admit that I think some of these new models look really cool, and that they won't just form part of my Blood Angels army, although that could look quite cool as well. They may not form my main army but they will be fun to paint and display.


I chose not to use the new paints from GW, partly due to price but also due to the fact that I didn't want to wait until today to get the chance to paint my new model. Originally I base coated the armour with Balthasar Gold and tried to follow the GW White Dwarf guide for painting the model but it didn't really give me the affect I was after.


Instead I moved away from the Reikland Fleshshade and switch to my favourite shade, Agrax Earthshade. Seriously, Agrax has made my models look awesome more often than I care to remember, if I ever hear that GW are replacing it I will have to buy up all the pots of it in my local area!


For the blue shield and shoulder pads Kantor Blue is great, and then you can use Teclis blue for the edge painting, as GW suggest. The little details on the model really do benefit from the edge painting, it makes the White Scar really pop on the model and adds depth to the blue which otherwise could look quite flat and boring.


I just want to finish this off by saying please don't write off the Age of Sigmar release because of the internet trolls who feel that they need to criticise every small part of the game. Yes there are some silly parts, there are some oversimplifications and there are some errors of judgement. But every game has these. It is the community that makes or breaks a game, we can take this average game and make it into something fun and special. Give Age of Sigmar a go, don't expect it to be Warhammer Fantasy 8th Edition, just go out and have fun with some good friends and it may just surprise you.

Cheers,

Jon

I'm going to start with an assumption here, everyone reading this review probably dreamed of "locking S-Foils in attack position" as a kid. You probably played the original X Wing, maybe TIE Fighter, X Wing vs TIE fighter or even X Wing Alliance (blowing up the Second Death Star at the end of this one was a great climax for the end of the campaign).

I will also assume that you collected the old Micro Machines Star Wars models. Spending many hours in your room choreographing great space battles where heroes of the Rebellion and the Empire clashed in epic stories from your imagination.

Unfortunately, as the years pass by there has been no new X Wing game on PC, Micro Machines has ceased to exist and our creativity has been curtailed by the mundane tasks of a 9-5 working day. But I am here to tell you that salvation is at hand! And it comes in the form of Fantasy Flight's ("FF") X-Wing Miniatures game.


The system is easy to pick up and play, and you can add complexities as you go along, and it also combines the best parts of the games mentioned earlier (OK, maybe the combat isn't quite as good as the PC games). You can collect the miniatures from FF much like your old Micro Machine models and the game system allows you to plot out those epic, tactical space battles of your childhood once more.

Everything you need to get started comes in a reasonably priced set (between GBP 20 - 30 depending on where you shop) that doesn't take up as much room as some other starter sets out on the market (looking at you GW and Age of Sigmar). One criticism I have of the X-Wing starter set is that I feel FF could have included more than 3 models, yes the 3 models work perfectly well for the quick start game but you will want to move onto bigger battles very quickly. To accomplish this I found myself picking up a second starter set, this gives you more dice, more markers and more movement templates as well as 3 extra models. Obviously FF want you to buy their expansion sets to develop your game but a little bit more in the starter set would not have gone amiss.


When you open up the starter set you find that everything is neatly set out for you. The cardboard templates and tokens are sturdy although I can see many players moving onto plastic templates as their cardboard ones wear out. Fantasy Flight also provide a catalog of their other products in the set, but this doesn't feel intrusive, I found myself flicking through it after my first game and finding a number of other systems that appeal to me.


There are two sets of rules provided in the box. A simpler quick start guide that gets you straight into the action providing you with the basics and decently sized rulebook for the more advanced game that you will move onto. Unlike most tabletop games the rules for this system are succinctly laid out and you won't spend hours flicking through pages just so that you can get a simple game going with friends or family.


You receive 3 attack and 3 defence dice which are the bare minimum for the game, this is another good reason to pick up a second starter set. You can also pick up more dice from FF or one of their chosen retailers. The dice themselves are D8s that are unique to this system (or at least unique to FF systems) so you won't be able to make do with a regular D6. Saying that, using these dice is a lot simpler than rolling D6 in a system such as 40k, for X-Wing you both roll the required number of dice and compare your results straight up (in the quick start game, the regular game does allow you to play modifiers), no tables, no to hit and then to wound rolls, just roll your dice compare the results and deal out the damage. Simples.


I briefly mentioned about that you can play modifiers which affect the number of dice you roll. Mainly these come in the form of cards, to be more specific pilot and upgrade cards, and they do exactly what they say "on the tin". For each model you can pick a particular pilot, these pilots have a points value, which allows you to keep the game balance, and also list the upgrades that they allow you to take. Pilots can add a different bonus to their craft in terms of actions and upgrades that they can take.


Upgrades come in the form of crew, secondary weapons and pilot upgrades. Each of these will have a particular points value and count towards your final force total. You will, eventually, end up building a very small but specialised force or a larger but more basic force and each has it's own merits and play styles. Unlike other games there is a balanced game in here and you very rarely end up facing some sort of "deathstar" (the irony) list.


The models themselves do feel a bit delicate, but if you take good care of them then they should last you for a long time. I must also praise FF for the level of detail they have put into the models. Each one is lovingly detailed and I must reserve particular praise for the TIE Fighters which I felt were just slightly more impressive than the X-Wing model. If they put this level of detail into the models in the starter sets I can't wait to see the level of detail in the expansion sets. Each model comes pre-painted but you can add your own paint scheme if you wish. Honestly, I could not see myself doing a better job so I doubt I will repaint my models.


So, with the starter set itself out of the way, let's move onto the game itself. As I mentioned there are two sets of rules in the starter set, the main rules and a simpler quick start set of rules, and I will try to run through these concurrently. In truth the quick start rules will only be used one or twice as an introduction to the game and you will move on to the full ruleset very quickly.

In the full rules you will find that there are four phases. Planning, Activation, Combat and End. In the quick start rules the planning, activation and combat phases are simplified. The planning phase involves each player secretly picking a particular movement for their ships to make. Each choice comes with a differing level of difficult, from green (easy) to white (normal) to red (difficult), although this is ignored in the quick start game. The level of difficulty that your movement requires directly impacts the activation stage, white movements have no affect, while red movements add a stress token and green movements remove a stress token. If any ship has a stress token then it is not allowed to take a further action in the activation stage.

You activate your ships in ascending order of your pilots' skill. Therefore your academy pilots get to move first working all the way to your unique characters who move last. While the quick start game does not have any additional actions, in the regular game each pilot/ship can take an action as long as they aren't stressed, as mentioned previously. These actions are detailed on the pilot's information card and will be a choice of barrel roll, evade, focus or target lock. The barrel roll is the only one that does not have a direct effect on the combat phase, simply moving your position on the board slightly. Evade actions help improve your defence while focus and target lock improve your damage output but as you can only choose one action for each ship you have to carefully pick what you would like each to do.


Once you move on to the combat phase you then activate your ships in descending order of pilot skills, so your characters will go first and the academy pilots will go last, if the skill levels are tied then the Imperials will usually go first as they have initiative, although particular missions may give the Rebels the initiative. The quick start game does this slightly differently to make the game a bit easier, keeping the activation in the same order as the movement phase. Additionally, the quick start game treats all damage the same, whereas the full ruleset has different outcomes for damage and critical damage. Regular damage just knocks either a hull point or shield point off your model, but a critical damage roll can have more dire consequences such as additional damage or wiping out some of those extra upgrades you paid for. Ships with shields stand a better chance of avoiding critical damage early on as their shields cancel out the critical effects, although you still lose a shield point as though it was a hull point. Once your shields are knocked out then your ship is just as delicate as those without shields so be wary and make sure to take care in combat, carelessness costs lives ;).

The final phase of the game turn is the End phase. In this phase you simply total up what happened in the previous phases and see if anyone has met their required victory conditions. For the quick start game this is a case of seeing if one side has lost all of it's models, but the full ruleset has different mission objectives for whichever scenario you are playing out.

Because the rules are not overly complex you can get a decent sized game completed in a relatively short period of time. Also, because you are working through each phase together there isn't time for one player to get bored while the other takes all their actions. The game itself is well balanced and because it has such a captivating subject matter it is likely to hold it's appeal with gamers. Also, while the game states it is only for two players it could easily be expanded to more players working on two teams. With the release of the "Scum and Villainy" force you could even expand the game to three teams although I would need to test it out to see if this works.

In conclusion, this game system has the potential to have a long lifespan, appealing to gamers of all age groups, you don't even have to be a fan of Star Wars to enjoy it although that certainly helps. If there is one criticism from me that is the fact that the starter set could probably use some more models and dice, but for the relatively low price of the starter set this isn't a major qualm and you can pick up two starter sets for less than you would pay for one starter set in other gaming systems. The quality of the models is second to none and, while they are a bit more flimsy than perhaps I would like, the quality of the painting really brings the models to life. I cannot wait to expand my collection of models and start working on new dangerous squadrons to take to the skies of the Star Wars universe. Thank you Fantasy Flight!

The Force is strong with this one.